Last updated: Apr 19, 2026
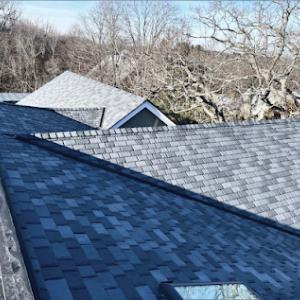
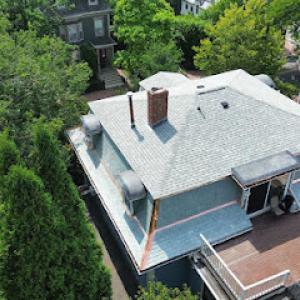
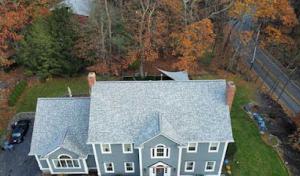
Melrose winters regularly bring snow followed by temperature swings that create repeated freeze-thaw stress on shingle edges, flashing joints, and roof penetrations. That cycling can push water under shingles and around vents, dormers, and chimneys where it drains poorly or freezes again. With older housing stock featuring complex rooflines, dormers, and masonry chimney intersections, the danger is real: snow can back up, refreeze, and lift edges, even on roofs that look solid from the ground. Shaded roof sections near tree cover and the Middlesex Fells side of the city tend to hold snow and moisture longer, increasing ice-dam risk and moss growth compared with sunlit exposures. This isn't cosmetic-the patterns you see this winter could become costly failures if not addressed promptly.
Pay close attention to the edges of shingles, along valleys, and where flashing meets the chimney and skylight penetrations. In Melrose, those areas are the first to show signs of trouble after a thaw followed by another cold snap. Moss, granule loss, and stained streaks near gutters can indicate underlying ice-dam activity. Dormers create multiple corner points where water can back up; a single compromised flashing seam there becomes a recurring leak point each freeze-thaw cycle. If shading from mature limbs keeps parts of the roof damp for longer, the risk multiplies: moisture sits where sun can't reach, and ice dams form earlier in the season.
Begin with a careful seasonal check of the roof, paying special attention to the flashing joints around the chimney and any dormer connections. Clear loose debris from the roofline and gutters if it's safe to do so-blocked drainage compounds the freeze-thaw stress. When snow is present, avoid chipping ice directly off the roof; instead, remove soft, piled snow with a plastic shovel from the low-slope edges, working toward the center and avoiding contact with flashing. If you see water spots on ceilings or damp patches in the attic, stop and call a roofing professional to assess for possible ice-dam intrusion and attic ventilation issues before the next thaw cycle.
A well-ventilated attic becomes your best defense against repeated freeze-thaw damage. Ensure there is a clear path for warm air to exit the attic, reducing the warm roof zones that melt snow on contact and push water toward edges and penetrations. Insulation should keep the attic temperature closer to the outside, especially on the upper reaches around dormers and masonry intersections. In complexes with shaded roofs, consider adding or upgrading ridge and soffit vents, and seal any gaps around penetrations where warm attic air can escape and melt snow unevenly.
Set up a seasonal maintenance plan that targets the most vulnerable areas: complex rooflines, dormers, and chimney intersections. Schedule a roof inspection after the last heavy snowfalls and again after the first thaws of spring. If moss is present on shaded sides, treat it promptly with approved moss-control methods to prevent moisture retention that accelerates ice damage. Finally, document any observed changes on the roof-small issues caught early save significant stress later and help you plan effective repairs before the next winter cycle.
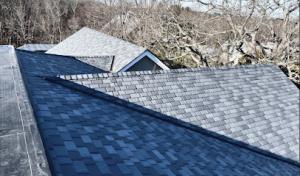
Asphalt shingles are a practical fit for the older single-family homes that make up much of the stock here. Those Colonials and Capes often sit on modest framing and extra weight from heavier tile systems can pull on rafter spans or require structural review. In this town's reroof rhythm, asphalt keeps the weight manageable while still delivering a durable, weather-resistant surface. On homes with multiple penetrations-chimneys, skylights, or vent stacks-the easier installation of asphalt helps you seal around those details without overly stressing the deck below.
Warm, humid summers in this area invite algae staining and moisture retention on aging asphalt. The effect shows up most on north-facing slopes and lots where large trees shade the roof for extended periods. If you notice dark streaks or a greenish tinge developing year after year, it's a sign to consider algae-resistant shingles or a treatment plan that doesn't require stripping the old layer. A lighter-colored shingle can help reflect sun on sensitive faces of the house, while keeping the overall look consistent with the neighborhood's historic lines.
Repeated winter expansion and contraction can shorten the service life of brittle or poorly ventilated shingles, even when there's no obvious storm damage. In Melrose, the insulating cycle of freezing nights and thawing days is a regular stress test for the roof deck. If soffit vents or ridge vents aren't providing steady airflow, you'll see faster drying of the attic and less condensation on the underside of shingles. Prioritize a balanced ventilation plan that pairs soffit intake with ridge exhaust, especially on roofs with limited attic space or long, narrow run counts.
Where chimneys and skylights puncture the roof, asphalt systems must be detailed for reliable edge and flashing work. Pay close attention to step flashing at chimney corners and to the transition zones around skylights. In older homes, plywood decking near penetrations can be uneven or slightly warped; plan for shim adjustments and a careful sealant schedule to avoid micro-leaks that worsen with freeze-thaw cycles.
A practical maintenance routine starts with a yearly inspection after the last snowmelt. Focus on shingles near penetrations, along eaves, and on any slopes shaded by trees. Clean gutters to prevent ice dams, and address moss or algae growth promptly with non-pressure cleaning and appropriate treatments. When you see curling, cupping, or missing granules, flag it early for a replacement plan that matches the house's architectural character and keeps the roof performing through another harsh New England winter.
The most popular roofing material in the US. Find pros who install, repair, and replace asphalt shingles.
Kingdom Roofing & Construction
(617) 230-6239 www.kingdomconstructionma.com
Melrose, Massachusetts
5.0 from 13 reviews
Peak Quality Roofing
(781) 650-7458 peakqualityroofing.com
58 Mt Vernon Ave, Melrose, Massachusetts
5.0 from 98 reviews
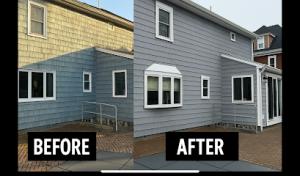
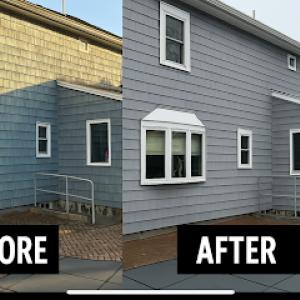
Peak Quality Roofing, based in Melrose, MA, specializes in roofing, siding, and gutter services for homeowners throughout the area. We provide high-quality roofing, expert siding installation and repair, and reliable gutter services to protect your home from the elements. Founded by industry professionals, our company was built on the belief that homeowners deserve fair pricing without sacrificing quality. Our team is committed to exceptional craftsmanship, clear communication, and complete customer satisfaction on every project. Whether you need a new roof, siding replacement, or gutter installation, Peak Quality Roofing delivers durable, long-lasting solutions tailored to your needs. Contact us today for a free estimate.
Kingdom Roofing & Construction
(617) 230-6239 www.kingdomconstructionma.com
Melrose, Massachusetts
5.0 from 13 reviews
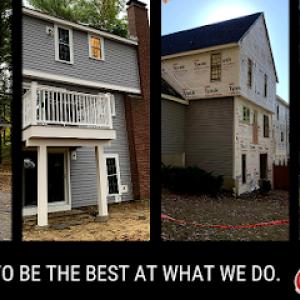
At Kingdom Roofing & Construction, Inc., we take pride in offering premier roofing services to the greater Boston area, From Lowell to Westford, North Reading, Chelmsford, Newton, and Billerica. As a leading roofing contractor, our expertise spans metal and shingle roofing, new roof installations, and comprehensive roof replacements. We specialize in leak detection and repairs, storm damage restoration, and energy-efficient roofing options that enhance your home's durability and performance. Beyond roofing, we provide siding and painting services, decking and porch construction, as well as home renovation and remodeling. Trust Kingdom Construction, Inc. to deliver quality craftsmanship and responsive service tailored to your needs.
Master Seal Roofing
(781) 941-6119 mastersealroofing.com
Serving
4.5 from 85 reviews
Here at Master Seal Roofing we are licensed,bonded and fully insured.We have been in business over 23 years,and are roof repair and replacement experts.We specialize in all types of roofing, leak repair,flat roofs, and more.We give free fully detailed estimates with pictures,with no obligations.We work on residential and commercial properties.We have 24/7 emergency roof repair, snow and ice removal with 100% satisfaction guaranteed.All our work comes with a 5-10 year maintenance programs free of charge.We stop your roof from leaking and can locate were it's leaking from to stop further damage in one trip,and offer same day service. We can stop your leaking roof.We provide all types of roof repairs and replacements and overlays.
McGilley Roofing & Construction
(781) 520-9086 www.mcgilleyroofing.net
Serving
4.9 from 49 reviews
McGilley Roofing & Construction has served Saugus and surrounding communities since 2004, backed by over 30 years of roofing experience. We specialize in roof installations, roof repairs, siding replacements, siding repairs, gutter installations, and gutter repairs for residential and commercial properties. As a GAF Certified contractor, we offer top-tier materials, strong warranty coverage, and honest workmanship. We provide free estimates, maintain clean job sites, and prioritize every customer’s peace of mind. Family-owned, fully insured, and built on trust.
Ramirez Painting Corp | Roofing & Remodelling
(617) 275-2682 www.ramirez-painting-corp.com
Serving
5.0 from 29 reviews
At Ramirez Painting we make a concerted effort to provide exceptional service at incredibly affordable rates. Our ability to set employ th latest innovations in the industry has made us a leader in the industry. Don’t believe us? Call now… Our services include: → Painting → Carpentry → Masonry → Roofing → Gutter Cleaning
Northeast Industrial Roof
Serving
5.0 from 123 reviews
With 20 years of experience, Northeast Industrial Roof INC is your trusted roofing company in Medford, MA. Located at 510 Riverside Ave, we specialize in shingle, metal, tile, cedar, EPDM, slate, flat, green, TPO, and PVC roofing. Our services cover both commercial and residential roofing needs, including roof repair, maintenance, replacement, waterproofing, and gutters. Whether you need a new roof, a repair, or regular maintenance, our expert team is here to help. Choose us for reliable, high-quality roofing services in Medford and surrounding areas. Your satisfaction is our priority. Keywords: roofing Medford MA, roofing company Medford MA, roofing contractor Medford MA.
Brady Roofing
(781) 324-4312 www.markbradyroofing.com
Serving
5.0 from 14 reviews
Mark Brady Roofing serving homeowners and business in Malden, MA for the past 40+ years. Our team is made up of seasoned roofing professionals dedicated to making each home's roof as safe, secure with a touch of curb appeal. Our years of roofing experience has given us the opportunity to develop proven processes to ensure the roofing project has been thought through in detail, planned, materials ordered, received and staged for proper installation.
Holland Homes Roofing
(781) 864-2525 www.roofwithhh.com
Serving
5.0 from 41 reviews
Welcome to Holland Homes Roofing, where we specialize in quality residential roofing you can see. We understand that roofing repairs are among the most formidable repairs for homeowners. A roof is a costly investment, and you don’t want to leave repairs to just anyone. You want a residential roofer that is experienced, reliable and affordable. For that, you need Holland Homes Roofing, your local Owens Corning Preferred Contractor based in Carver, MA. We have decades of experience in the residential roofing industry and our team has been serving the area for many years. If you need a roofing repair or installation, gutter work or any other roofing-related services for your home, anywhere from Carver to Billerica, contact us today!
Prudentia Home Solutions
(617) 821-6303 prudentiahs.com
Serving
4.9 from 8 reviews
Our team at Prudentia Home Solutions specializes in new deck and carpentry installation, as well as upgrades to decks and home repairs, at a high quality that cannot be beat by our competitors. We also offer services in exterior and interior painting to truly service to all your needs. Since our beginning in 2011, our experienced team has completed more than 5,000 unique and successful projects for our wonderful clients. We take pride in the lasting relationships we build with our clients, with a more than 75.6 percent return rate for repeat customers. The relationships between our expert craftsmen and valued clients circles back to our central objective of building relationships by building trust.
Mairink Roofing Experts
(978) 566-2537 mairinkroof.com
Serving
5.0 from 12 reviews
We are a local Residential & Commercial roofing contractor located in Revere, MA. At Mairink Roofing, we strive to deliver the best quality services at an affordable price. Whether it is a small repair or a full roof replacement, you can count on the team at Mairink Roofing to get it done right the first time! Since 2014, Mairink Roofing has served the Roofing needs of our neighbors in Boston and surrounding areas. We treat our customers like family, and they appreciate our approach to every residential or commercial project that we take on. When you work with us, we create a personalized proposal for you. We will keep you informed every step of the way so you know every step of the way what's going on on your roofing project.
ABI Roofing
(617) 539-2090 medford-roofing-service.us
Serving
5.0 from 17 reviews
ABI Roofing, based in the vibrant city of Medford, stands as a premier roofing contractor dedicated to safeguarding homes and businesses with top-notch roofing solutions. With a wealth of experience, ABI Roofing excels in providing expert installations, repairs, and maintenance services tailored to meet the unique needs of Medford's diverse architectural landscape. Our skilled team of professionals is committed to delivering unmatched craftsmanship, using high-quality materials to ensure durability and longevity. At ABI Roofing, customer satisfaction is our priority, and we take pride in our transparent communication, competitive pricing, and timely project completion. Trust ABI Roofing to elevate your property's protection.
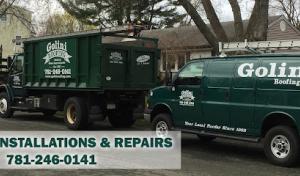
Golini Roofing
(781) 246-0141 goliniroofing.com
Serving
5.0 from 13 reviews
Golini Roofing, located at 46 Nahant Street in Wakefield, MA, is your premier choice for top-notch roofing services. As a trusted local roofing contractor with over 40 years of experience, we specialize in roof installation, roof replacement, and comprehensive residential roofing solutions. Our expert team is dedicated to delivering unparalleled craftsmanship and uses high-quality materials for long-lasting results. We also offer professional gutter installation and repair. Serving communities including Beverly, Burlington, Melrose, and more, Golini Roofing is committed to providing personalized service and lasting solutions. For reliable roofers near you, contact Golini Roofing today!
Chimney-related roof work is especially relevant in Melrose because many homes have older masonry chimneys that create flashing and counterflashing failure points. The way brick breathes and settles on hilly streets near the Fells means that those metal flashings can crack, lift, or pinch over time, especially where the chimney intersects rake edges, valleys, or dormers. If the chimney chase isn't properly flashed, even a small hairline gap can become a cold-weather problem, inviting icicles to form along the brick line and letting water travel down into attic spaces. Pay close attention to the first signs of mortar chalking, rusted step flashing, or stained ceilings below the chimney-these aren't cosmetic issues, they're the early alarms of a larger moisture problem.
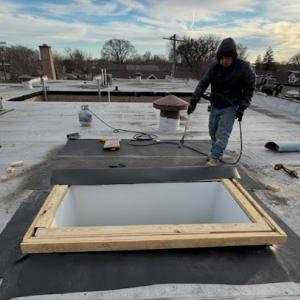
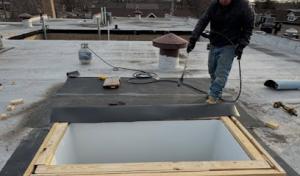
Skylight repairs matter locally because snow, ice, and seal aging can turn curb and flashing details into recurring leak sources during late winter and spring rains. In many older homes, skylights sit on or near old roofs with limited flat planes and subtle slopes, which concentrates ice buildup and thaw cycles around the seal. Examine the skylight flange and the surrounding shingles each season, not just after a storm. If the curb shows any smoothing or if the glazing bead looks loose, the problem won't disappear on its own; curb leaks invite interior dampness and can warp ceiling finishes before the calendar turns to milder weather.
On older roofs, leaks often trace to penetrations and transitions rather than broad field-shingle failure, making detail work more important than surface appearance alone. Places where a chimney, dormer, vent, or skylight meets the roof deck are the usual trouble spots, especially on shaded or north-facing planes that stay damp longer. Valleys and apron details around these penetrations are common failure zones because ice dam pressure can push sealants and flashing out of place. Routine inspection should follow the line where roof meets metal or asphalt edges, look for dry rot in the sheathing around penetrations, and test the integrity of cement or metal counterflashing. If a leak is suspected here, it's not just a patch job-it's a careful resealing and, if needed, a targeted replacement of flashing components to restore the stack's weather-tight barrier.
In all cases, treat penetrations as you would a delicate seam: gentle handling, precise sealing, and a plan for replacing aging materials before hidden damage spreads. A proactive approach saves more than immediate repair costs; it preserves attic insulation, minimizes ice-dam risk, and keeps interior spaces dry through the worst melt-and-refreeze cycles.
Find contractors experienced in skylight installation, flashing, and leak repairs to bring natural light into your home.
Peak Quality Roofing
(781) 650-7458 peakqualityroofing.com
58 Mt Vernon Ave, Melrose, Massachusetts
5.0 from 98 reviews
Kingdom Roofing & Construction
(617) 230-6239 www.kingdomconstructionma.com
Melrose, Massachusetts
5.0 from 13 reviews
Winter in this town brings heavy snow cover and frequent freeze-thaw cycles, which makes tear-offs slower and leak triage more common than full replacements. If a roof is already marginal, a mid-winter tear-off can stretch into a chaotic sequence of temporary fixes. For a homeowner, the practical approach is to plan major work for the coldest stretch only when temperatures stay consistently above freezing for several days during the day and night. In practice, that means targeting a window after the snowpack begins to recede and before the most severe freeze cycles return, with contingencies for sudden storms that can push crews off the roof mid-project. Ice dams and blocked eaves should be anticipated, and prioritizing attic ventilation improvements before the first hard freeze can reduce surprise leaks once a project starts.
Spring can be unpredictable, with variable rain and the occasional hail risk that complicates deck drying, underlayment exposure, and inspection timing. If a tear-off is needed, ensure the roof deck is completely dry and free of frost before any underlayment goes down. Schedule inspections for early to mid-spring when the ground is workable and weather windows are more frequent, but allow flexibility for late-season rain that can pause work and push sequences back. Hail-damaged areas should be inspected promptly after storms to avoid hidden water intrusion once leaves come off and sun exposure starts drying hidden leaks. A staggered approach-dry-in repairs in dry spells, then finish in a longer window-can reduce the chance of rewetting fresh work.
Fall is popular for reroofing, yet wind and precipitation can tighten contractor calendars and delay flashing-sensitive work before winter sets in. If planned in this season, aim for a completion buffer that accounts for an early cold snap and windy conditions that complicate asphalt shingle installation or metal flashing work. Prioritize flashing checks around chimneys, skylights, and dormers while temperatures are still forgiving. Schedule with an eye toward the first hard freezes, ensuring sealants and fasteners have adequate cure time and that gutters are clear to prevent water backup during autumn storms.
In Melrose, the alignment of weather, access on hilly streets, and the rhythm of winter recurrences all influence project timing. Build a phased plan that sequences tarp and dry-out steps ahead of any tear-off, uses monitored weather windows for decking exposure, and allows rapid mobilization after a dry spell. Clear communication with the crew about anticipated cold snaps and storm events helps keep the project on track and reduces the chance of weather-driven delays.
Get a clear picture of your project costs upfront - no commitment required.
Peak Quality Roofing
(781) 650-7458 peakqualityroofing.com
58 Mt Vernon Ave, Melrose, Massachusetts
5.0 from 98 reviews
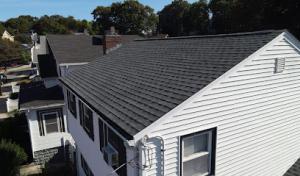
Asphalt shingles are the most common in older Melrose homes, typically running about 350 to 700 USD per square. Metal roofs sit higher, generally 600 to 1100 USD per square. Clay tile comes in higher still, roughly 900 to 1600 USD per square, while concrete tile lands around 800 to 1500 USD per square. Wood shingles or shakes skew toward the higher end, about 700 to 1200 USD per square, and synthetic or composite shingles fall in between, roughly 600 to 1000 USD per square. These ranges reflect material cost alone and do not yet include underlayment, flashing, or labor, which can add a meaningful step up on a tight Melrose job.
Costs in this town can rise on older homes with steep pitches, dormers, chimneys, skylights, and tighter access on established neighborhood streets where staging and debris handling are less efficient. The combination of shaded roof planes and frequent penetrations can also push up the amount of flashing and ice-dam prevention work required. For steep or fragmented roof lines, crews often need extra days to protect nearby landscaping and to maneuver equipment, which translates to higher daylight and labor costs. Expect to pay a premium for materials and labor when the roof needs custom detailing around chimneys or dormers, or when adding or upgrading skylights and ventilation.
Demand spikes after winter damage and spring storm events can affect pricing and lead times in Melrose more than in markets with steadier year-round roofing conditions. When the weather turns warm and the phone rings after a harsh winter, you may see longer waits for materials and scheduling, plus potential premium charges for expedited work. If a reroof is planned during a busy spring window, budgeting for a small cushion helps avoid delays that push up temporary housing or duplicate access setup costs. In contrast, a mid-summer or early fall window might offer steadier crews and fewer staging challenges.
When selecting materials, weigh long-term durability against the local climate. Asphalt shingles provide a solid, cost-conscious option for many older homes, while metal can better resist ice dams on steep or shaded slopes. For historic masses or homes with visible parapets, clay or concrete tile offer distinct looks and high durability but require a structural assessment and potentially more framing work. Wood shingles or shakes deliver traditional curb appeal but demand meticulous maintenance and can incur higher replacement costs when repointing and flashing are needed. Synthetic or composite shingles offer a middle ground with consistent performance and moderate installation complexity. Use the ranges above to frame a budget and then work with a local roofer who can assess pitch, penetrations, and access, tailoring a plan to your specific Melrose property.
Explore specialists in steel, aluminum, and standing seam metal roofs built to last 50 years or more.
Kingdom Roofing & Construction
(617) 230-6239 www.kingdomconstructionma.com
Melrose, Massachusetts
5.0 from 13 reviews

In Melrose, a full reroof generally requires a building permit, and the applicant or the contractor must submit plans to the City of Melrose Building Department. The permit process is not just a formality: it ensures that the roof layout, penetrations (chimneys, skylights, vent stacks), and overall attachment method meet local code and neighborhood expectations. Since older homes in this area often carry layered roof details, submitting a clear plan that documents existing conditions, the proposed roof assembly, and any shingle or underlayment choices helps prevent delays. If a project involves removing multiple layers or changing roof geometry, expect closer scrutiny of structure, decking condition, and venting strategy.
Inspections in Melrose are typically scheduled during construction and again after completion to verify installation quality, flashing, and venting compliance. During the live phase, inspectors check that proper nailing patterns, underlayment installation, and flashing around penetrations are executed as specified. After completion, the final inspection confirms that the roof system is fully integrated with attic ventilation, drip edge, and water-shed integrity. If the project includes a chimney chase or skylight work, be prepared for targeted checks on flashing transitions and sealants. Coordinating inspection appointments with weather conditions helps minimize delays caused by frost, ice, or extended cold snaps common in this climate.
Because Melrose has many older homes with layered roof details and penetrations, permit and inspection coordination matters most on full replacements rather than minor patch work. Full reroofs require careful documentation of all penetrations and the transition details where different roof planes meet. It is advisable to identify any special constraints early-such as steep pitches, limited access in tight urban lots, or proximity to utility lines-and arrange pre-construction meetings with the Building Department and the contractor. Proper sequencing of deck repair, underlayment, flashing, and venting components helps ensure smooth inspections and reduces the risk of rework after a failed initial review.
Maintain an organized project folder with updated roof plans, product data sheets, and a clear sequence of installation. Schedule permit submission before ordering materials to align with your contractor's timeline. If layering exists on the existing roof, document all layers and their removal plan for the inspector. Post-completion, have access to the final attic ventilation report and warranty information for the permit closure. Effective communication between homeowner, contractor, and the Building Department is the key to a timely, code-compliant reroof.
Massachusetts homeowners insurance remains generally available in Melrose, but premiums can rise after major storms and for homes with prior wind or hail loss history. After a severe nor'easter, expect questions about your roofing age, attic insulation, and previous repairs. Being proactive with documentation can help you avoid delays when the insurer reviews a claim.
Melrose homeowners should expect insurers to request photos, damage documentation, and a licensed contractor estimate before approving roof-related claims. Having clear, dated records of the damage and any temporary protective measures you installed can streamline the review process and reduce back-and-forth with the adjuster.
Adjusters may perform on-site inspections in Melrose to confirm storm damage and verify that replacement work was actually completed. If you received an initial payment, expect follow-up to confirm that replacement materials and workmanship align with the claim scope and any applicable roofing standards.
To avoid complications, keep a dated log of every contact, repair, and material delivery, and store photographs in a weatherproof folder. Regularly photograph ice-dam evidence, gutter involvement, and attic ventilation conditions, as well as flashing around chimneys and skylights to show changes over time.
Common Melrose-specific factors influence claim outcomes. Dense, older homes on hilly streets near the Middlesex Fells develop more ice dam stories, and winter sun shadows shape roof dryness. Many roofs have multiple penetrations from chimneys and skylights, which means your claim may pivot on proper flashing and attic ventilation to prevent future leaks. Insurance outcomes hinge on documentation of preexisting conditions and post-storm repairs.
After the adjuster visit, you may need to coordinate with the contractor for corrective work before any final payment. If you dispute a denial or a partial payment, having organized photos, dated notes, and independent estimates can support negotiations. Stay patient; the process may take several weeks to complete fully.
Connect with contractors who help homeowners navigate the claims process from damage assessment to final approval.

Flat and low-slope roofing is a practical reality on older homes with rear additions, porch roofs, and transition areas that age differently from the main steep roof. In Melrose, these areas sit in shade or near tall walls and chimneys, which slows dry-out after storms and invites freeze-thaw stress. Understanding how these pieces behave helps you plan for longer-lived membrane performance and fewer winter leaks.
Snow retention and slow drainage on low-slope sections can push water toward edge details, membrane seams, and wall transitions before the main roof covering shows trouble. Look closely at edge metal, parapet details, and where the flat section ties into masonry or siding. Chimneys and vent collars act as trouble spots because cold air and wind-driven snow funnel meltwater right into the flashing. In Melrose, expect more winter cycling here, and inspect after heavy snows or thaws when patches can appear.
Start by clearing roof drains and checking for standing water after storms. Inspect for blistering or puffy areas in the membrane, which can indicate moisture beneath. Examine edge metal for corrosion or loose fasteners, and test any internal gutters or scuppers for proper flow. Trace leaks by following dampness along the low-slope transitions up to the wall or chimney chase. If color staining appears on interior walls near a flat section, prioritize that area during inspection.
Schedule regular resealing around penetrations and along the transition to the main roof. Consider upgrading to a higher-quality edge metal and ensuring a robust drip edge to direct water away from wall assemblies. When planning any repair, pay special attention to the wall interface and chimney chase, since those joints endure the most freeze-thaw stress and are most likely to fail first on a Melrose flat roof.
Find specialists in TPO, EPDM, and built-up flat roofing systems for residential and commercial properties.
Kingdom Roofing & Construction
(617) 230-6239 www.kingdomconstructionma.com
Melrose, Massachusetts
5.0 from 13 reviews
When a cold snap hits the hills and shaded roofs start taking on ice, every hour counts. The Melrose market rewards contractors who can respond quickly, set up temporary protection, and keep a weather window open for repairs. You'll want to screen for crews that can prioritize rapid triage during winter storms-covering exposed penetrations, tarping gaps near skylights, and mobilizing heat cables if necessary. A contractor with a plan for emergency visits, not just a typical two-day schedule, helps prevent freeze-thaw cycles from worsening damage. Look for clear communication about arrival windows, documented response times, and a solid on-site plan to keep water from backing up under shingles until permanent repairs can be made.
Cleanup behavior on a crowded street matters in established residential blocks where driveways and landscaping are tight and lot lines are close. Ask about job-site protection, material staging, and how crews handle debris so as not to create landscaping damage or driveway scuff marks. A reputable local firm will describe how they contain waste, protect mulch beds and porches, and clean gutters and downspouts without leaving nails or loose shingles behind after the job ends. Local crews with strong cleanup standards reduce the risk of costly repairs to neighboring properties and preserve neighborhood streetscape, which is a practical value in Melrose's older housing stock.
Homeowners in Melrose increasingly favor reroofing experience and established, enduring companies over purely new-construction specialists. The right contractor brings a track record of complete roof replacements on similar homes, understands chimney and dormer penetrations, and has documented references in nearby neighborhoods. Avoid firms that cannot demonstrate multiple reroof projects on older homes with complex detail work. A seasoned company often offers better detailing for ice-dam prevention, including proper underlayment choices in cold seasons, strategic eave ventilation, and careful flashing around stacks and valleys that are common problem points on Melrose rooftops.
Evaluate whether the contractor accounts for freeze-thaw risk in an initial assessment, prioritizes ice-dam mitigation strategies, and documents a comprehensive plan for gutters, downspouts, chimney/chimney-penetration flashing, and skylights. Request a written proposal that outlines temporary protection steps, a seasonal maintenance approach, and a clear sequence for a reroof that minimizes disruption to nearby homes. Local references who can speak to reliability in winter conditions are especially valuable for choosing the right partner.