Last updated: Apr 19, 2026
Independence homeowners face a two-season damage pattern rather than a single peak threat. Winter ice damming and spring hail exposure create recurring stress on roofs, with cold, snowy winters amplifying load on the decking and back-up risk at eaves after repeated freeze-thaw cycles. That means a roof can look fine after a mild winter, only to reveal damage in spring when ice melts and hidden fasteners loosen under renewed moisture. Planning for both seasons is essential, not a one-off inspection mindset.
Cold, snowy winters in the Cleveland-area climate push water up under shingles and along eave edges, increasing the risk of interior leaks when gutters clog or flashings fail. Ice buildup at the edge of the roof can widen existing gaps, accelerate shingle wear, and stress underlayment layers. When every freeze-thaw cycle repeats, attic ventilation and insulation quality become critical. Poor ventilation compounds the problem by creating warmth at the roof plane, which melts and refreezes, forming larger dams. A proactive approach includes inspecting for soft spots, missing granules, and signs of moisture intrusion after significant storms or heavy snowfall events.
Because Ohio insurers typically require clear proof separating storm damage from age-related wear, photo documentation after hail, wind, or ice events is especially important in this market. Start a habit of taking timestamped photos from multiple angles: roof faces, gutters, vent flashing, and any interior signs of leakage. Pictures should capture granule loss, lifted shingles, dented metal, cracked caulking, and any sagging sections. When possible, compare current images to previous records to highlight new damage. After a hailstorm or wind event, document debris on the ground, attic moisture, and any stained ceilings or warped drywall. Immediate, organized records reduce back-and-forth with insurers and help clarify whether replacement is warranted by storm impact versus aging.
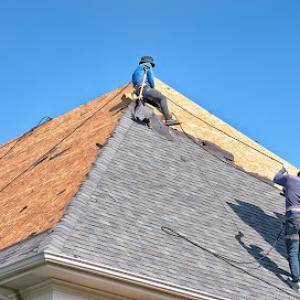
After a significant storm, schedule a roof inspection within 48 to 72 hours if safe to access. A trained observer should look for wind-exposed edge damage, missing granules, and uplifted shingles, as well as ice dam indicators such as icicles forming along eave lines and signs of water infiltration near ceilings. Maintain a storm diary: dates, weather notes, and notes from each inspection, paired with fresh photos. If damage is suspected, prioritize documenting exterior conditions before temporary repairs, such as tarping, to prevent further interior intrusion. Coordinate with a trusted roofing professional who understands the local climate pattern and can provide a clear, stepwise plan for assessment, repair, or replacement aligned with the two-season risk cycle.
The practical replacement window in this area is typically late spring through early fall. Cold-weather installation tends to be less ideal after snowy winters and before autumn weather turns, so most homeowners plan around those milder months. That means a project scheduled to start in late May or early June often lands in the sweet spot where crews can work steadily without the interruptions that come with early-season frost or late-season storms. If a spring lull slips into early summer, a quick check-in with the contractor helps lock in dates before peak demand hits.
Spring and early summer scheduling can tighten quickly after regional hail and wind events, which can push up wait times for full re-roofs. Independence experiences frequent storm cycles that stress systems and raise the urgency for replacements. If a damaging event occurs, focus on securing a safe and timely assessment, then confirm an installation window that preserves the best weather days. Even in normal years, keep buffers in the calendar for readiness-crew availability, material delivery windows, and the inevitable stray storm that can delay a start by a day or two. For those targeting a fall finish, aim to lock in a start date by late summer to avoid the post-summer rush.
Warm, humid summers with regular rainfall mean crews must manage underlayment exposure carefully during active weather stretches. Prolonged heat or sudden downpours can affect how quickly underlayment dries and how long it stays exposed during installation. In Independence, planning around stretches of dry, moderate heat helps maintain a steady pace without compromising roof deck protection. When a storm front moves through, crews may pause to protect open sections, then resume as the weather clears. Homeowners should anticipate occasional day-by-day adjustments and ensure access to the attic and interior spaces remains clear for quick inspections and tarping as needed.
A common pitfall is misaligned expectations between the homeowner, contractor, and the weather forecast. Given seasonal variability, set up a primary contact and a backup, and request regular updates on anticipated start dates, material lead times, and expected finish windows. In an area with frequent hail events, the initial property assessment may quickly pivot from a routine inspection to a full replacement plan; staying flexible helps keep the project on track. When the weather looks unsettled, confirm how the crew will protect the home during rain and how long temporary protections stay in place if delays occur. Clear, proactive communication can smooth the transition from assessment to full deployment, even when May storms pressure the timeline.
Get a clear picture of your project costs upfront - no commitment required.
Rocket Roofing
(330) 800-7947 www.callrocketroof.com
Independence, Ohio
5.0 from 37 reviews
We build relationships with property owners who want peace of mind with their roof!
Lifetime Quality Roofing
(216) 270-7555 www.lifetimequalityroofing.com
5000 Rockside Rd #500, Independence, Ohio
4.6 from 114 reviews
Lifetime Quality Roofing provides Cleveland homeowners and businesses with trusted roof replacement, storm damage repair, and commercial roofing services. Serving Cleveland since 2011, our team specializes in asphalt shingle leak repairs, professional gutter installation, and full-service roofing solutions. We understand the seasonal challenges Northeast Ohio brings and build roofs that last. Our commitment to reliable service, expert craftsmanship, and honest inspections makes us Cleveland’s go-to roofer. Whether repairing damage or upgrading your roof, we’re here to help. Schedule a free roof inspection today and experience Lifetime Quality Roofing’s unmatched commitment to excellence.

Liberty Restoration
7311 Valley View Dr, Independence, Ohio
3.7 from 43 reviews
Liberty Restoration maintains an honorable reputation and is an accredited roofing company with the Better Business Bureau with an A+ rating. You can count on Liberty Restoration to deliver an end-product you’ll be confident in. We offer high-value solutions for roofing, siding, and gutter repair and installation. You’ll never have to wait when it matters most. Liberty Restoration is there when you need it.
Mr. Roof Cleveland
Serving
4.8 from 476 reviews
Mr. Roof Cleveland is the premier roofing contractor in Cleveland, Ohio, serving homeowners with premium exterior solutions since 1962. We specialize in high-quality roof replacement and roof repair, often completing installations in just one day. As an Owens Corning Platinum Contractor, we offer industry-leading Lifetime Warranties on labor and materials. Beyond roofing, our team is expert in vinyl siding, replacement windows, gutters, and masonry. Whether you need emergency storm damage repair or a full exterior makeover, trust our licensed and insured team for honest pricing and free estimates. Experience why we are Cleveland, Caton, & Akron's top choice for residential roofing. Call today!
Erie Home
Serving
4.5 from 173 reviews
Since 1976, Erie Home has manufactured, supplied, and installed the best-performing roofing on the market. By providing ironclad warranties and convenient financing, we ensure that every homeowner we work with receives top quality service and value for their homes and properties. Erie Home professionals are the roofing company of choice in the greater Cleveland, OH area. Whether you need roof inspections or roof damage repair services, Erie Home has been the go-to roofing contractor for nearly 50 years because of our attention to detail and dedication to making sure our customers are satisfied with their results. Contact us today for a quote and see why we're the trusted roofing company Cleveland counts on.
Excellent Exteriors Roofing & Siding of Stow
Serving
5.0 from 11 reviews
Searching high and low for a quality roofing or siding contractor to handle your roof replacement or siding installation project? Well stop the search now because the guys over at Excellent Exteriors Roofing and Siding in Stow, Ohio have all of Summit County, Ohio and the remaining areas covered...pun intended when it comes to their roofing and siding needs. Furthermore, we also handle window installation, chimney repair and rebuilds and basically any exterior remodeling job you want to throw at us. Call us today for all of your residential and commercial needs and we'd love to provide you with a free estimate!
Strongsville Roofing & Exterior Repairs
(216) 505-4530 strongsvilleroofrepairs.com
Serving
5.0 from 71 reviews
We are a Strongsville-owned and operated residential and commercial roofing company serving Strongsville and the Cleveland suburbs for over 30 years. From roof repair to roof inspections and installations - we do it all. In addition to roofing, we do exterior house repairs of all kinds: we repair gutters, skylights, decks, siding, chimneys, and more. We respond to calls quickly and will be there fast in case of any emergency. Hire Strongsville Roofing & Exterior Repair services to get your home into shape fast! Give us a call today!
Hof Roofing & Construction Parma
(440) 409-4689 www.hofroofing.com
Serving
5.0 from 77 reviews
Hof Roofing in Parma Ohio is your go to Roofing Company. We specialize in Roof replacement and roof repair. Parma is our home, and we service all of North East Ohio. Hof Roofing also provides Siding replacement and repairs. We work on both residential and commercial properties! We maintain high standards and our customer satisfaction is very important to us. We are rated A+ on the BBB, and have thousands of references online. We are your local roofer!
Roof Maxx of Parma, OH
Serving
4.8 from 56 reviews
Roof Maxx of Parma is your go-to solution for affordable and eco-friendly roof rejuvenation in Northeast Ohio. Our plant-based formula restores the flexibility of aging shingles, extending your roof’s life by up to 15 years with three simple treatments. Avoid the expense and hassle of traditional roof replacement, and enjoy peace of mind with our five-year transferable warranty. We provide free roof inspections and tune-ups with every application. Contact our team today!
MK Roofing & Construction
Serving
5.0 from 9 reviews
MK Roofing & Construction is a premier roofing contractor based in Chagrin Falls, Ohio, dedicated to providing outstanding roofing solutions for residential and commercial properties. We specialize in a wide range of services, including roof repair, installation, maintenance, restoration, and replacement. We proudly serve areas such as Bainbridge, Solon, Hunting Valley, Novelty, and Orange. As a locally owned and established business, we prioritize building lasting relationships with our clients in Chagrin Falls and the surrounding communities. Our reputation for reliability, integrity, and professionalism has made us a trusted choice for all roofing needs. Let MK Roofing & Construction provide you with a roof that stands the test of time!
Cruz Roofing company
(216) 202-0654 cruzroofingcompany.com
Serving
5.0 from 18 reviews
Cruz Roofing Company is a reliable contractor that specializes in providing high-quality roofing solutions for residential and commercial properties. With a focus on metal and asphalt shingle roofing systems, they are dedicated to craftsmanship and customer satisfaction, delivering impeccable results that ensure peace of mind for their clients.
Ohio Roofing Siding & Slate
(216) 862-4553 www.ohioroofingsidingandslatellc.com
Serving
4.9 from 419 reviews
Your first choice in Roofing and Siding Installation and Servicing the NE Ohio. Family Owned and Operated. Over 25 Years experience with any of your roofing needs.
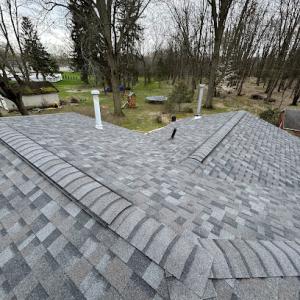
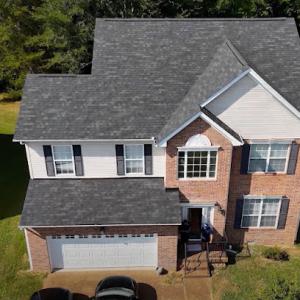
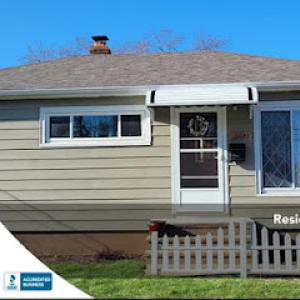
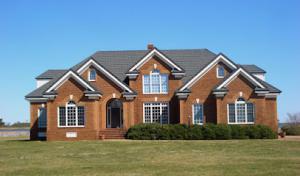
Asphalt shingles remain the dominant practical choice for most homes in this area. They pair well with a wide range of house styles common in Independence and are relatively straightforward to install on standard roof structures. The material's familiar look and forgiving wind performance make it a reliable fit for the Northeast Ohio climate. In this region, summer heat and sun exposure accelerate aging of the shingle surface and underlayment, so a quality underlayment and proper ventilation become important upgrades during installation. Look for a premium asphalt shingle with a high tear resistance and a reflective granule finish to help reduce heat buildup on attic space. If your roof is more than 15-20 years old, a careful assessment of the nailing pattern and flashing joints is warranted, since worn sealants can compromise long-term performance in storm events.
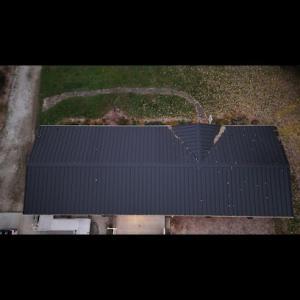
Metal roofing offers excellent wind resistance and a long service life, making it appealing for homes with steeper pitches or coastal-influenced eave lines. In Independence, metal can handle hail better than many traditional shingles, and its low weight reduces structural concerns on aging roof decks. The reflective surface helps mitigate heat gain in hotter summers, which can ease cooling loads. When choosing metal, pay attention to panel profile, fastener type, and sealant compatibility with adjoining materials. A well-sealed edge detail and accurate attic ventilation stay crucial, because winter snow and ice load tests fastening, flashing, and attic turnover. If your roof supports a modern or craftsman look, metal can complement the styling while delivering robust performance against the region's storm season.
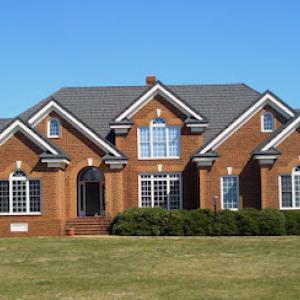
Clay tile delivers a distinctive profile and excellent longevity, but its heavier weight requires careful structural assessment and professional installation. In areas that experience substantial snowfall, clay tile requires precise underlayment and robust fasteners to resist freeze-thaw movements and ice damming at eave lines. Tile roofs often suit homes with Mediterranean, Mission, or Spanish-inspired aesthetics, where the visual impact matches the architectural intent. If you choose clay, ensure the roof deck is rated for the load, and confirm that the installation includes proper tile-to-flashing details and venting to manage moisture and heat.
Concrete tile shares many benefits of clay tile in appearance and resilience, but its modest weight and varied thickness can influence structural needs and wind-resistance calculations. For snow-prone zones, attention to installation quality-particularly at ridges, hips, and penetrations-helps prevent ice-related stress. Concrete tile offers broad color and texture options, making it a flexible choice for a range of home styles while delivering excellent durability and long-term weather resistance.
Wood shingles or shakes bring natural warmth and curb appeal to many Independence homes, especially on heritage or cottage-style properties. They demand regular maintenance to prevent moisture-related issues and decay, and they are more susceptible to hail damage. In winter, the fasteners must stay secure and flashing must be tight to minimize potential ice damming. If choosing wood, select rot-resistant species and consider a protective coating system that suits your climate cycle, plus an upgraded attic ventilation plan to support wood's performance.
Synthetic or composite shingles mimic natural textures while offering improved impact resistance and lower maintenance needs. They perform well under high heat and heavy snow loads when installed with appropriate underlayment and ventilation. This option often appeals to homeowners seeking a contemporary aesthetic or a longer warranty without sacrificing range of styles. Proper alignment, seam integrity, and flashing compatibility matter, especially in storm-prone years. Ind iv idual house styles and structural capacity guide whether this option best fits the roof's geometry and load profile.
In this area, asphalt shingles sit in a practical mid-range for budgeting, with typical Independence pricing running about 350 to 650 USD per square. That range reflects common suburban roof shapes and the standard tear-off efforts seen on older duplexes and ranch homes around the Cleveland metro. When a storm hits and calls for rapid re-roofing, crews can push toward the higher end as materials, crew time, and access tighten. For most continua of repairs, asphalt remains the go-to option because the installers in this market are accustomed to the winter weather window and the need for solid ventilation and flashing work.
Metal roofs run higher, generally 600 to 1100 USD per square. This range accounts for heavier panel systems, more intricate flashing, and the potential for extended installation timelines during busy spring and early summer storm seasons. Independence homes with steep pitches or unusual geometry may see closer to the upper end, especially if the roof line is long or has several valleys. Metal can pay off over time with durability, but the initial outlay is noticeably influenced by how much tear-off is required and how aggressively crews must secure seams against typical Cuyahoga weather patterns.
Clay tile typically falls from 1000 to 1800 USD per square, while concrete tile sits around 900 to 1600 USD per square. In this market, clay and concrete tile are favored on select suburban homes with Mediterranean-inspired or more formal roof lines, where weight and wind performance matter. Costs climb with roof complexity, as tile requires careful underlayment and strap systems, plus precise flashing details around chimneys and skylights. Storm-season demand can tighten schedules, nudging prices higher due to contractor availability and transport times for specialty products.
Wood shingles or shakes usually run 550 to 1000 USD per square, while synthetic or composite options sit 500 to 900 USD per square. These choices are common on older neighborhoods with visible architectural details or on newer builds seeking a particular curb appeal. Wood carries additional considerations for ventilation and insulation compatibility, especially in humid summers. Synthetic options in this region balance appearance with durability and often benefit from lower maintenance during the more turbulent shoulder seasons.
Costs in Independence can rise after regional storm activity when re-roof demand spikes across the Cleveland metro and contractor schedules compress. Pricing also shifts with tear-off complexity, flashing work, ventilation corrections, and roof geometry common to established suburban homes rather than simple new-construction layouts. If you're weighing materials, plan for weather-driven scheduling and ask the contractor to itemize tear-off, disposal, and underlayment as separate line items to compare apples-to-apples. In a storm-lean year, securing a detailed written scope and a realistic timeline helps prevent surprise delays and price bumps.
Don't let upfront costs delay a critical repair - these contractors offer payment plans to fit your budget.
A full re-roof in Independence typically requires a permit issued by the City of Independence Building Department. Missing permits can slow down the project, invite fines, and complicate insurance documentation after a storm. When a contractor pulls the permit, the job gains official eyes on the work, which matters after harsh winter freezes and spring hail. The permit acts as a formal record that the roof replacement follows local codes and safety expectations, and it helps you defend any later storm-related insurance claims by showing proper oversight.
Inspections are commonly scheduled during tear-off and again after installation, with attention to underlayment, flashing, venting, and nailing patterns. In this area, inspectors will verify that the underlayment is properly installed to shed moisture from snow and ice. They will check flashing around chimneys and valleys, ensuring it won't trap water or fail under freeze-thaw cycles. Venting is critical to prevent moisture buildup in attic spaces, which can worsen ice damming in heavy snow years. Nailing patterns must meet code for wind exposure and the fastener schedule to resist seasonal gusts. Plan for both the tear-off day and a final walkthrough to avoid a second trip that could stall the project.
The permit is expected to be posted on site, and the city's review process is generally straightforward with modest turnaround times. Having the permit visibly displayed avoids late-night questions from neighbors or code officers and signals that the replacement is proceeding through the proper channels. If a setback occurs-whether due to weather, material delivery, or inspection findings-the clear path forward is often contained within the permit record, so keeping that documentation accessible makes communications with the contractor and the city simpler. In neighborhoods with storm-driven demand, reminders to schedule inspections promptly help keep the project from lingering through the next freeze or thaw cycle. A smoothly posted permit and timely inspections reduce the chance of weather-related delays complicating storm-damage repairs and insurance postures.
In this storm-exposed corner of the valley, hail and high-wind events are a common trigger for claims, and Ohio carriers commonly cover hail and wind damage when the claim is well documented and the replacement scope is clearly supported. The key is showing a coherent link from the storm to the damage, not a scattered set of issues that look like pre-existing wear.
Adjusters in this market often scrutinize whether damage is a recent storm loss versus pre-existing deterioration, making dated photos and contractor documentation important. A clear photo chronology-from before the storm, through the event, to post-damage conditions-helps separate conditions caused by a single incident from long-term aging. Include notes from a local contractor about observed defect progression and wind-related distress on ridge caps, vents, and flashing.
For larger roof losses, some carriers may request detailed estimates, extensive photos, and sometimes more than one assessment before approving scope. Expect to provide a line-by-line estimate, a photographic gallery showing problem areas, and possibly a re-inspection after temporary repairs. A written summary from a trusted roofer explaining required tear-off, underlayment needs, and replacement sequence can ease the back-and-forth and improve clarity.
In Independence, snow, ice damming, and spring hail create a pattern of damage that can evolve quickly. Keep a storm diary tied to your roof's vulnerable points-valleys, drip edges, and chimney connections-so you can demonstrate when damage became evident and how it progressed with the season. Document attic condensation and ice dam risk as these issues often accompany exterior signs and influence scope decisions.
Be aware that missteps in documentation or gaps between storm timing and observed damage can lead to disputes or limited coverage. The prudent homeowner keeps consistent, dated records, coordinates closely with a reliable local contractor, and communicates a straightforward narrative to the insurer, aligning storm impact with the needed replacement scope.
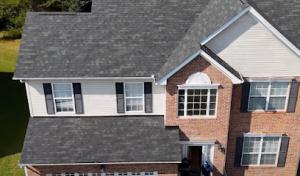
Chimney-related roof work is a notable part of the local contractor market, which matters because flashing failures often show up before field shingle failure on older suburban homes. In many Independence houses, the chimney flare and step flashing are the first lines of defense against water intrusion. When a chimney vent or chase sits on a roof with seasonal freeze-thaw cycles, the flashing can weaken quietly. Expect to see caulking hairline cracks, metal edging pulling away, or rust staining at the base after heavy storms.
Autumn winds and leaf buildup can stress flashing transitions and roof penetrations, especially around vents and chimney intersections. Clear gutters and downspouts before the first heavy winds, and inspect the area where the chimney steps meet the roof deck. If leaves accumulate near the chimney, the added moisture can wick under shingles and into the flashing. Watch for wind-driven shingle lift near bone-dry attic vents, which often coincides with flashing movement during seasonal shifts.
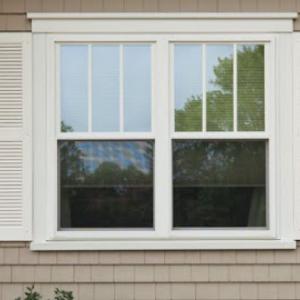
Skylight repair is a meaningful specialty in this market, making curb flashing and surrounding shingle integration a recurring local concern. When a skylight sits on an older roof, curb flashing can separate from the deck as shingles shift with temperature changes. Check the seam between the curb and the shingles for fine gaps or any staining along the flashing flange. A well-sealed curb flashing area matters as much as the skylight unit itself for long-term performance.
Perform a hands-on check from the ground using binoculars to spot lifted shingles or corroded metal around chimneys and skylights. Prioritize flattening any warped flashing with a professional sealant and reseating loose shingles to preserve the integrity of the roof deck. If you notice moisture staining in ceilings after a storm, plan a bring-in with a roofer who understands chimney and skylight integration to avoid cascading leaks. Document prior repairs with photos for storm-damage claims and future work notes.
Find contractors experienced in skylight installation, flashing, and leak repairs to bring natural light into your home.
Strongsville Roofing & Exterior Repairs
(216) 505-4530 strongsvilleroofrepairs.com
Serving
5.0 from 71 reviews
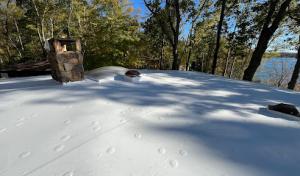
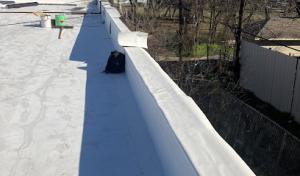
Independence features a mix of residential homes with a surprisingly strong commercial contractor presence, so you'll find more low-slope roofing expertise than in strictly residential suburbs. Regular rainfall and winter ponding mean that membrane condition, edge metal, and drain performance matter on any low-slope section or flat transition. When a roof overhangs a porch or blends into a sunroom or garage, the edge details can reveal how well a contractor handles both steep-slope and flat transitions in one project.
In flats or low-slope zones, pay close attention to membrane integrity, flashing at penetrations, and the condition of edge metal where water tends to gather at the eave. Ponded water should not linger near seams, seams should be fully sealed, and drain lines must carry water away promptly during storms. Regular rain and winter melt cycles in this climate can reveal slow drainage, which leads to ice-damming risks on adjacent steeper sections. For a home with a porch roof or a small flat add-on, ensure that transitions are flashed to the main roof with continuous drip edge protection and properly sized scuppers or internal drains.
Properties with mixed pitches benefit from choosing contractors who routinely handle both steep-slope and flat transitions, not just one specialty. Ask for examples of projects with integrated low-slope areas and verify that the same crew can coordinate tear-off, backup insulation, and flashing details across different roof planes. When planning, prioritize crews that document membrane wear, edge metal corrosion, and drain performance in their findings, so you have a clear path for long-term water management across all roof types on the property.
Find specialists in TPO, EPDM, and built-up flat roofing systems for residential and commercial properties.
Ohio Roofing Siding & Slate
(216) 862-4553 www.ohioroofingsidingandslatellc.com
Serving
4.9 from 419 reviews
Because Independence roofs are exposed to snow, ice, hail, summer heat, and regular rain, the details of how flashing is sealed, how ventilation is integrated, and how the shingles are nailed matter as much as the brand you choose. A durable roof in this climate relies on a tight edge, proper step and tail nailing, and continuous ventilation to prevent ice damming and premature failure. When evaluating bids, you should not dismiss the installation sequence or the quality of fasteners as minor. Those steps directly affect performance under our typical winter storms and hot Ohio summers.
A meaningful share of local contractors advertise warranties, which makes warranty terms and installation standards a practical comparison point in this market. Look for both manufacturer warranties and contractor workmanship coverage. Manufacturer warranties often require specific installation methods, roof ventilation, and product care guidelines. If a contractor's workmanship warranty is included, confirm its duration, what it covers, and whether there are conditions tied to annual inspections or maintenance. In practice, you want coverage that survives the first few harsh seasons, not a promise that fades after the first year.
Post-install inspection by the city adds another layer of accountability, but it does not replace checking contractor workmanship promises and manufacturer-backed coverage. A city inspection verifies that the installation meets code basics, not that every flashing lap, nail pattern, or attic vent connection complies with the finer points of the chosen shingle system. Use the city review as a baseline, then verify with your contractor that their installation aligns with both the manufacturer's installation guide and your home's specific exposure to snow, ice, and rain.